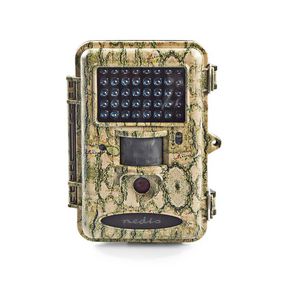
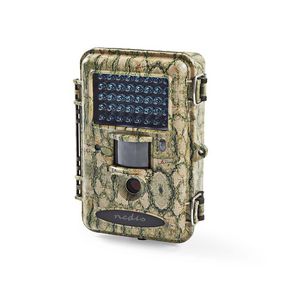
Fotopast
720p@30fps | IP68 | Černá IR | Noční vidění | Úhel záběru: 55 ° | Pohybový senzor | Úhel detekce: 55 ° | Rozsah detekce: 25 m | Velikost obrazovky: 5 " | LCD obrazovka | Vícebarevné

Vlastnosti
• Rozlišení videa: 1 280 x 720
• Vestavěný LCD displej + ovládací prvky umožňují snadnou manipulaci
• Nahrává obraz i zvuk
Balení
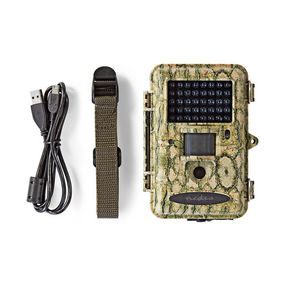
Obsah balení
1x digitální kamera
1x USB kabel
1x popruh
návod
Rozměry maloobchodního balení Dárková krabice
| Šířka | Výška | Délka |
|---|---|---|
| 110 mm | 168 mm | 84 mm |
Logistické rozměry
| Balení | Šířka | Výška | Délka | Hmotnost |
|---|---|---|---|---|
| 1 | 110 mm | 168 mm | 84 mm | 440 g |
| 20 | 565 mm | 345 mm | 205 mm | 9700 g |
Specifikace produktu
| Šířka |
95 mm |
| Výška |
130 mm |
| Hloubka |
50 mm |
| Hmotnost |
317 g |
| Materiál |
ABS |
| Typ zdroje napájení |
Napájení z baterie |
| Formát videa |
MP4 |
| Typ slotu pro externí paměť |
MicroSD |
| Pohybový senzor |
Ano |
| Odolnost proti nárazům |
Ano |
| Funkce časosběrného snímání |
Ano |
| Typ IR |
Černá IR |
| Displej |
LCD obrazovka |
| Typ kamery |
Fotopast |
| Formát obrázku |
JPEG |
| Maximální podporovaná kapacita paměťové karty |
32 GB (není součástí) |
| Maximální rozlišení videa |
720p@30fps |
| Vstupní napětí |
N/A |
| Noční vidění |
Ano |
| Podporované rozlišení fotografií |
12.0 MPixel |
| IP krytí |
IP68 |
| Barva |
Vícebarevné |
| Velikost obrazovky |
5 " |
| Doba Spuštění |
5 s |
| Délka Videozáznamu |
50 s |
| Úhel detekce |
55 ° |
| Rozsah detekce |
25 m |
| Úhel záběru |
55 ° |
| Počet LED |
20 LED's |
| Požadované baterie (nejsou součástí balení) |
8x AAA/LR03 |
Podpora
Často kladené otázky
Našli jsme vám následující dotazy v angličtině
How do I access and use the menu?
Set the switch to setup
press menu.
Use up and down to scroll through the main menu.
Press ok to enter a certain menu.
Use left and right to change the value of the particular option.
What does Camera Position mean?
This option allows you to give a camera aunique name so you can keep multiple camera's apart.
How Do I use the menu?
- Set the switch to setup (middle position)
- Press menu
- Use up and down to go to camera mode
- use left and right to change it to video if needed.
- Press down to set the clock. press enter to go into the date and time menu.
- Exit this menu and go to video size and select the resolution you want (1280x720 is the highest resolution)
- The next option is the video length. How long do you want it to record after a detection.
- Timelapse is an option that will have the camera take picture every 5 minutes (or 10, 15, 20 etc) and then stitches it into a video.
- PIR trigger: here you can set the sensitivity of the motion detection.
- PIR interval sets how often you want to scan with motion detection.
- Camera position is only a tag you can give your camera if you have more than one camera (camera 1 , camera 2 etc)
Difference between photo sizes
Difference between photo sizes: the resolution of the photo or video
What is photo burst?
Taking multiple photo's in rapid succession
When use video size 640x480 or 1280x720
Lower resolution means lower quality but you can store more video on your memory card, We recommend 1280x720 for best results
What means PIR and how to use it
PIR is the motion detection. Turn it on to make the camera record when it sees motion
how to use the mode button
mode is photo or video (do you want it to record a photo, video or both?)
when use the record button
This is for manual recording. typically this is not used.
how to use the on/off switch
to turn the camera on and off
which video length should i use and why
that's up to you. there is no right or wrong.
why and how use the timelapse
timelapse is a mode that takes pictures at certain intervals. Afterwards you can play this as a video. it looks like it is fast forwarded.
consequence of PIR trigger high, normal or low
high is sensitive: it will respond to smaller movements.
explanation of PIR interval
how often do you want it to scan for movement.
what is Camera Posit
It's the name of the camera, it is easier to keep multiple camera's apart.
With gentle shaking the camera, a black plastic ring pushes against the lens. Is that normal?
Sometimes the IR filter is in front of the lens, when the camera is turned off. The camera is not faulty. When the camera is on, it will fix itself to the right place in front of the lens.